How to Dry Herbs: DIY Techniques
Have you ever wondered how to preserve the freshness and flavor of your herbs long after the growing season has ended? Drying herbs is an age-old technique that not only extends their shelf life but also intensifies their aroma and taste. Whether you're a seasoned gardener or a culinary enthusiast, mastering the art of herb drying can transform your kitchen and your cooking. In this guide, we'll explore various DIY herb drying techniques, from air drying to dehydration, and provide you with all the tips and tricks you need to become a pro at herb preservation.
Why Dry Herbs?
Drying herbs is not just about convenience; it's about capturing the essence of nature in a form that can be enjoyed year-round. Fresh herbs are wonderful, but they have a limited lifespan. By drying them, you can lock in their flavors and use them in a wide array of dishes, from hearty stews to delicate teas. Plus, dried herbs make excellent gifts and can be used in various DIY herb projects, such as homemade potpourri or herbal bath salts.
DIY Herb Drying Techniques
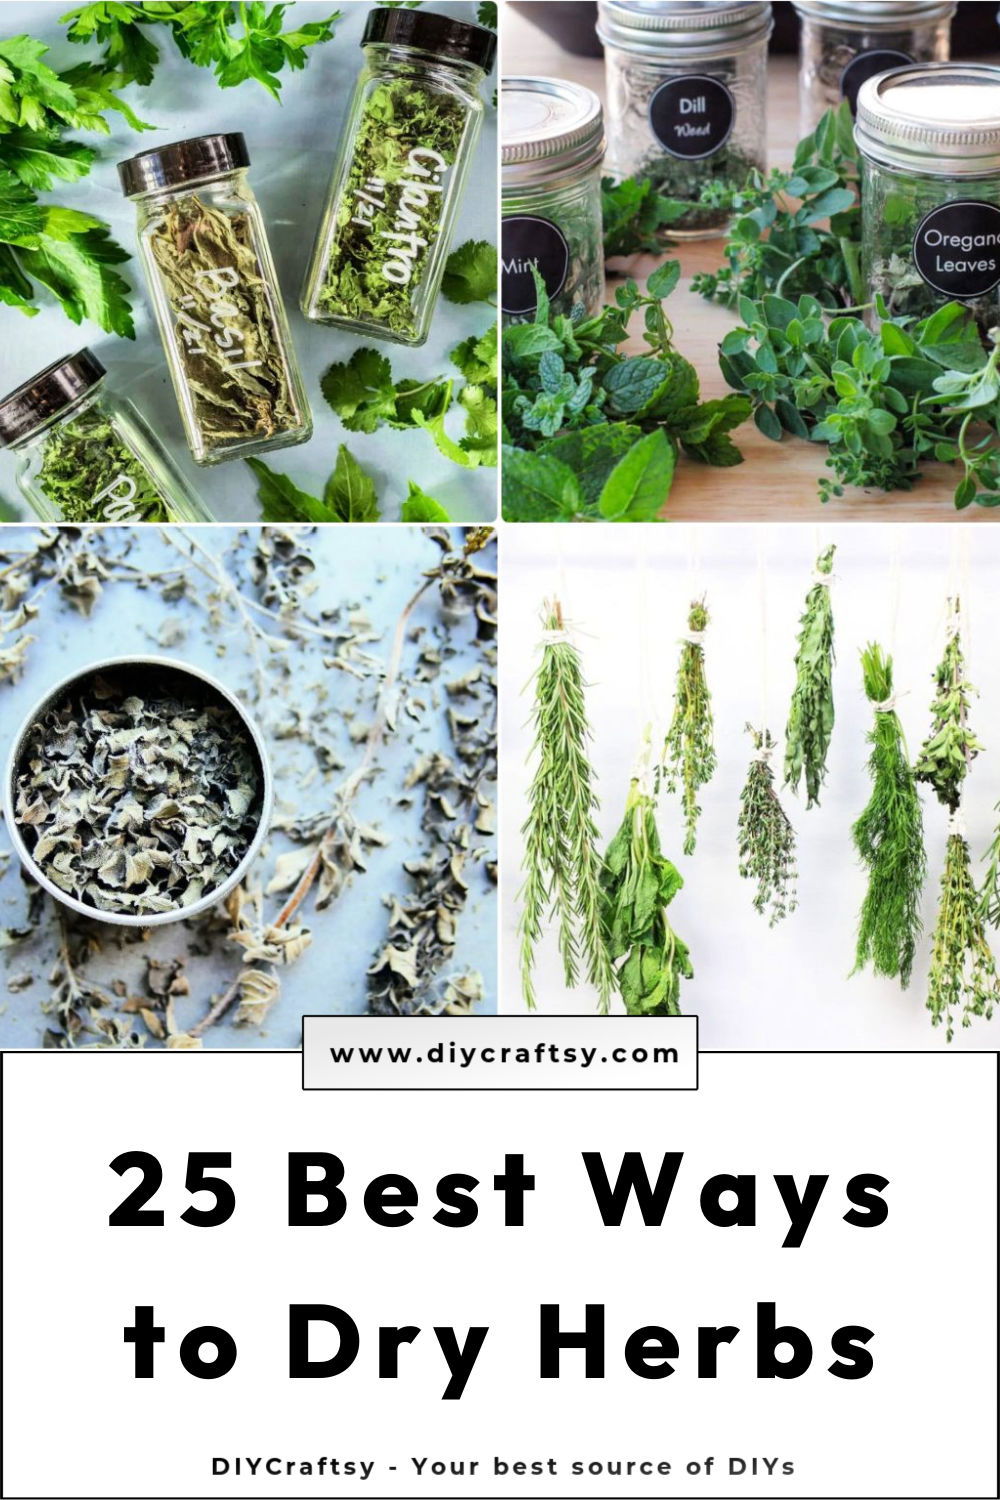
Air Drying Herbs
Air drying is one of the simplest and most traditional methods of herb preservation. It requires minimal equipment and is perfect for herbs with low moisture content, such as bay leaves, rosemary, and thyme.
Steps for Air Drying Herbs
- Harvesting: The best time to harvest herbs is in the morning after the dew has evaporated. This ensures that the herbs are at their peak freshness and flavor.
- Preparation: Gently wash the herbs to remove any dirt or debris. Pat them dry with a towel to remove excess moisture.
- Bundling: Tie the herbs into small bundles using string or rubber bands. Make sure the bundles are not too thick to allow for proper air circulation.
- Hanging: Hang the bundles upside down in a well-ventilated area, such as a kitchen or a pantry. Avoid direct sunlight, as it can bleach the herbs and reduce their flavor.
- Drying: Allow the herbs to dry for about 1-2 weeks, depending on the humidity and temperature. The herbs are ready when they feel crisp and crumble easily.
Tips for Air Drying Herbs
- Avoid Moisture: Ensure that the area where you hang the herbs is dry and free from moisture. Humidity can cause mold to grow on the herbs.
- Check Regularly: Inspect the herbs every few days to ensure they are drying evenly and to check for any signs of mold or pests.
Dehydrating Herbs
Dehydrating herbs is a quicker method that uses a food dehydrator to remove moisture from the herbs. This technique is ideal for herbs with higher moisture content, such as basil, mint, and parsley.
Steps for Dehydrating Herbs
- Harvesting: As with air drying, harvest the herbs in the morning after the dew has evaporated.
- Preparation: Wash the herbs and pat them dry. Remove any large stems or damaged leaves.
- Arranging: Spread the herbs in a single layer on the dehydrator trays. Make sure the herbs are not overlapping to allow for even drying.
- Dehydrating: Set the dehydrator to the lowest temperature setting, usually around 95°F (35°C). Dehydrate the herbs for 1-4 hours, depending on the type of herb and its moisture content.
- Checking: Check the herbs every hour to ensure they are drying evenly. The herbs are ready when they are crisp and crumble easily.
Tips for Dehydrating Herbs
- Low Temperature: Use the lowest temperature setting on your dehydrator to preserve the herbs' flavor and color.
- Rotate Trays: Rotate the trays occasionally to ensure even drying.
Oven Drying Herbs
If you don't have a dehydrator, you can use your oven to dry herbs. This method is quick and convenient but requires careful monitoring to prevent the herbs from burning.
Steps for Oven Drying Herbs
- Harvesting: Harvest the herbs in the morning after the dew has evaporated.
- Preparation: Wash the herbs and pat them dry. Remove any large stems or damaged leaves.
- Arranging: Spread the herbs in a single layer on a baking sheet lined with parchment paper.
- Oven Drying: Preheat your oven to the lowest temperature setting, usually around 170°F (75°C). Place the baking sheet in the oven and leave the oven door slightly open to allow moisture to escape.
- Checking: Check the herbs every 15-20 minutes to ensure they are drying evenly. The herbs are ready when they are crisp and crumble easily.
Tips for Oven Drying Herbs
- Low Temperature: Use the lowest temperature setting on your oven to prevent the herbs from burning.
- Monitor Closely: Keep a close eye on the herbs to ensure they do not overheat or burn.
Microwave Drying Herbs
Microwave drying is the fastest method for drying herbs but requires careful attention to prevent the herbs from burning. This technique is best suited for small quantities of herbs.
Steps for Microwave Drying Herbs
- Harvesting: Harvest the herbs in the morning after the dew has evaporated.
- Preparation: Wash the herbs and pat them dry. Remove any large stems or damaged leaves.
- Arranging: Spread the herbs in a single layer on a microwave-safe plate lined with a paper towel.
- Microwaving: Microwave the herbs on high power for 30-second intervals. Check the herbs after each interval to ensure they are drying evenly.
- Checking: The herbs are ready when they are crisp and crumble easily. This process usually takes 1-2 minutes.
Tips for Microwave Drying Herbs
- Short Intervals: Microwave the herbs in short intervals to prevent them from burning.
- Monitor Closely: Keep a close eye on the herbs to ensure they do not overheat or burn.
Herb Storage Tips
Once your herbs are dried, proper storage is crucial to preserve their flavor and freshness. Here are some tips for storing dried herbs:
- Airtight Containers: Store dried herbs in airtight containers, such as glass jars or plastic containers with tight-fitting lids.
- Cool and Dark Place: Keep the containers in a cool, dark place, away from direct sunlight and heat sources.
- Label and Date: Label the containers with the name of the herb and the date it was dried. This will help you keep track of the herbs' freshness.
- Check Regularly: Inspect the herbs regularly for any signs of mold or pests. Discard any herbs that show signs of spoilage.
Herb Preservation Methods
In addition to drying, there are other herb preservation methods you can explore. These methods can help you enjoy the flavors of fresh herbs even when they are out of season.
Freezing Herbs
Freezing is an excellent way to preserve the freshness and flavor of herbs. This method is particularly suitable for herbs with high moisture content, such as basil, parsley, and cilantro.
Steps for Freezing Herbs
- Harvesting: Harvest the herbs in the morning after the dew has evaporated.
- Preparation: Wash the herbs and pat them dry. Remove any large stems or damaged leaves.
- Chopping: Finely chop the herbs or leave them whole, depending on your preference.
- Freezing: Place the herbs in a single layer on a baking sheet lined with parchment paper. Freeze the herbs for 1-2 hours, or until they are solid.
- Storing: Transfer the frozen herbs to an airtight container or freezer bag. Label the container with the name of the herb and the date it was frozen.
Tips for Freezing Herbs
- Quick Freeze: Freeze the herbs quickly to prevent ice crystals from forming, which can affect their texture and flavor.
- Use Within 6 Months: Use the frozen herbs within 6 months for the best flavor and quality.
Herb-Infused Oils
Herb-infused oils are a delicious way to preserve the flavors of fresh herbs. These oils can be used in cooking, salad dressings, and marinades.
Steps for Making Herb-Infused Oils
- Harvesting: Harvest the herbs in the morning after the dew has evaporated.
- Preparation: Wash the herbs and pat them dry. Remove any large stems or damaged leaves.
- Chopping: Finely chop the herbs or leave them whole, depending on your preference.
- Infusing: Place the herbs in a clean, sterilized glass jar. Pour olive oil or another neutral-flavored oil over the herbs, ensuring they are completely submerged.
- Storing: Seal the jar tightly and store it in a cool, dark place for 1-2 weeks. Shake the jar occasionally to distribute the herbs.
- Straining: After the infusion period, strain the oil through a fine-mesh sieve or cheesecloth to remove the herbs. Transfer the infused oil to a clean, sterilized glass jar.
Tips for Making Herb-Infused Oils
- Use Fresh Herbs: Use fresh, high-quality herbs for the best flavor.
- Store Properly: Store the infused oil in a cool, dark place, away from direct sunlight and heat sources.
DIY Herb Projects
Dried herbs can be used in a variety of DIY projects that add a touch of nature to your home and life. Here are some ideas for DIY herb projects:
Herbal Tea Blends
Create your own herbal tea blends using dried herbs. Mix and match different herbs to create unique flavors and health benefits. Store the tea blends in airtight containers and enjoy them throughout the year.
Herbal Bath Salts
Make your own herbal bath salts by combining dried herbs with Epsom salts, sea salt, and essential oils. These bath salts can help soothe muscles, relax the mind, and provide a luxurious spa experience at home.
Herbal Potpourri
Create herbal potpourri by mixing dried herbs with flowers, spices, and essential oils. Place the potpourri in bowls or sachets around your home to freshen the air and add a touch of nature.
Herbal Wreaths
Make herbal wreaths by weaving dried herbs into a circular shape. These wreaths can be used as decorative accents in your home or given as gifts. They not only look beautiful but also release a pleasant aroma.
Conclusion
Drying herbs is a rewarding and practical skill that allows you to enjoy the flavors of fresh herbs year-round. Whether you choose to air dry, dehydrate, oven dry, or microwave dry your herbs, each method has its unique benefits and techniques. By following the steps and tips outlined in this guide, you can become a pro at herb preservation and explore a world of culinary and DIY possibilities. So, why wait? Start drying your herbs today and discover the joy of capturing nature's essence in every meal and project.
FAQs
How long do dried herbs last?
Dried herbs can last for up to 1-2 years when stored properly in airtight containers in a cool, dark place. However, their flavor and potency will decrease over time, so it's best to use them within 6-12 months for the best quality.
Can I dry herbs in the sun?
While it is possible to dry herbs in the sun, it is not recommended. Direct sunlight can bleach the herbs and reduce their flavor and color. It's better to dry herbs in a well-ventilated area away from direct sunlight.
What is the best temperature for drying herbs?
The best temperature for drying herbs is between 95°F (35°C) and 110°F (43°C). This temperature range helps to preserve the herbs' flavor and color while effectively removing moisture.
Can I use a microwave to dry herbs?
Yes, you can use a microwave to dry herbs. This method is the fastest but requires careful attention to prevent the herbs from burning. Microwave the herbs in short intervals and check them frequently to ensure they are drying evenly.
What are some creative ways to use dried herbs?
Dried herbs can be used in a variety of creative ways, including making herbal tea blends, herbal bath salts, herbal potpourri, and herbal wreaths. They can also be used in cooking, baking, and as natural remedies for various ailments.

0 Response to "How to Dry Herbs: DIY Techniques"
Post a Comment