Self-Watering Planter Guide, Easy Instructions

Self-Watering Planter Guide: Easy Instructions for Thriving Plants
Are you tired of constantly watering your plants, only to find them wilted and thirsty the next day? It's time to upgrade your indoor gardening game with a DIY self-watering planter. This nifty solution ensures optimal plant hydration, even when you're away. Let's dive into the world of self-watering planters and create one step-by-step.
What is a Self-Watering Planter?
A self-watering planter is like a mini ecosystem for your plants. It's designed with a water reservoir at the bottom, which gradually feeds water to the soil above. This automatic watering system keeps your plants hydrated for days, sometimes even weeks, without manual watering.
Why Use a Self-Watering Planter?
Imagine a self-watering planter as a reliable friend who waters your plants when you're on vacation. It prevents overwatering and underwatering, ensuring your plants get just the right amount of H2O. Plus, it's a game-changer for indoor gardening, keeping your urban jungle lush and healthy.
Materials Needed
Before we start, gather these materials:
- Two plastic buckets (one should fit inside the other with a slight gap)
- A small plastic container or cup
- A piece of cloth or fabric
- Potting soil
- Your favorite plants
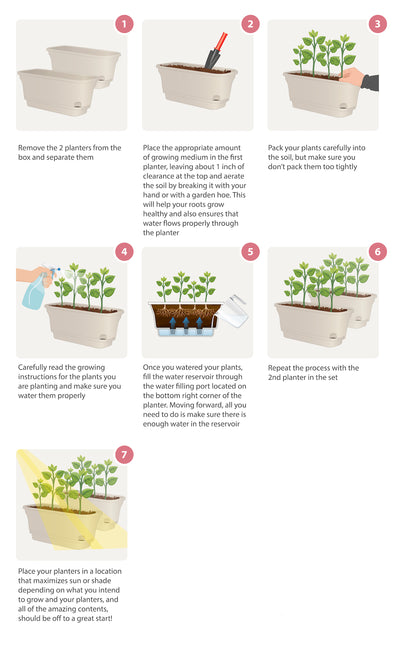
Step 1: Prepare the Inner Bucket
Take the smaller bucket and poke a few holes in the bottom. This allows water to seep through, creating that automatic watering effect.
Step 2: Create the Water Reservoir
Place the small plastic container or cup at the bottom of the larger bucket. This will serve as the water reservoir. Fill it with water, and you're good to go.
Step 3: Assemble the Planter
Place the inner bucket (with holes) into the larger bucket. Make sure it sits nicely on top of the water reservoir, with a slight gap between the two buckets.
Step 4: Add the Wicking Material
Cut a strip of cloth or fabric and place one end in the water reservoir. Drape the other end over the edge of the inner bucket. This acts as a wick, drawing water up into the soil.
Step 5: Fill with Soil
Fill the inner bucket with potting soil. Make sure to pack it down gently to remove any air pockets.
Step 6: Plant Your Greens
Now comes the fun part! Plant your favorite greens in the soil. Whether you're growing herbs, flowers, or leafy vegetables, this DIY planter is perfect for indoor gardening.
Step 7: Water from Below
Instead of watering from the top, pour water directly into the reservoir. This ensures the plant roots grow downwards, seeking out the water source.
Tips for Successful Self-Watering
- Choose the Right Plants: Some plants love constant moisture, while others prefer drier conditions. Research your plants' water needs before potting them in a self-watering planter.
- Monitor Water Levels: Keep an eye on the water reservoir. Top it up when it's running low to maintain consistent plant hydration.
- Avoid Overwatering: Even with a self-watering planter, it's possible to overwater your plants. Make sure the soil has good drainage to prevent root rot.
Benefits of Self-Watering Planters
- Consistent Watering: The automatic watering system ensures your plants get a steady supply of water, preventing the feast-or-famine cycle of manual watering.
- Time-Saving: With a self-watering planter, you can go on vacation without worrying about your plants. They'll be happily hydrated when you return.
- Eco-Friendly: Self-watering planters use water more efficiently, reducing waste and helping the environment.
Common Mistakes to Avoid
- Ignoring Water Levels: Don't let the water reservoir run dry. Your plants will suffer if they don't have access to water.
- Overpacking Soil: Avoid compacting the soil too tightly. This can prevent water from reaching the plant roots.
- Choosing the Wrong Plants: Not all plants thrive in constant moisture. Make sure your plants are compatible with a self-watering planter.
Troubleshooting Your Self-Watering Planter
- Wilting Plants: If your plants are wilting, check the water reservoir. It might be empty or not functioning properly.
- Mold or Mildew: If you notice mold or mildew, your planter might not be draining well. Ensure there's adequate airflow around the planter.
- Root Rot: If your plants show signs of root rot, you might be overwatering. Reduce the water supply and ensure good drainage.
For more tips and tricks, check out this comprehensive guide on self-watering planters.
Conclusion
A self-watering planter is a fantastic solution for indoor gardening enthusiasts. It ensures optimal plant hydration, saves time, and is eco-friendly. With our easy instructions, you can create your own DIY planter and enjoy thriving plants all year round.
FAQs
Can I use a self-watering planter for all plants?
- No, some plants prefer drier conditions. Research your plants' water needs before using a self-watering planter.
How often should I refill the water reservoir?
- It depends on the plant type and size. Monitor the water levels and refill as needed.
Can I make a self-watering planter from other materials?
- Yes, you can use various materials like glass jars, plastic bottles, or ceramic pots. Get creative!
What if my plants are still wilting in a self-watering planter?
- Check the water reservoir and ensure the wick is functioning properly. If the problem persists, your plants might not be suitable for a self-watering planter.
Can I use a self-watering planter outdoors?
- Yes, self-watering planters can be used outdoors. Just ensure they're protected from extreme weather conditions.
0 Response to " Self-Watering Planter Guide, Easy Instructions"
Post a Comment