Grow Microgreens at Home, Easy Steps
How to Grow Microgreens at Home: Easy Steps for Indoor Gardening
Growing microgreens at home is a rewarding hobby that brings fresh, healthy greens right to your kitchen. These tiny, immature plants are packed with nutrients and flavor, and they're incredibly easy to grow. Let's dive into the simple steps to cultivate these little powerhouses indoors.
Why Grow Microgreens at Home?
Before we get started, you might be wondering, why bother growing microgreens at home? Well, aside from being a fun indoor gardening project, microgreens are ready to harvest in just 1-3 weeks. Plus, they're versatile and can be used in salads, sandwiches, smoothies, or as a garnish.
What You'll Need
To start your microgreen journey, you'll need a few supplies:
- Microgreen seeds (like broccoli, kale, arugula, or radish)
- A shallow tray or container (with drainage holes if you're not going the hydroponic microgreens route)
- Potting soil (if not growing hydroponically)
- Water
- A spray bottle
- Light (sunlight or grow lights)
Choosing Your Microgreen Seeds
The first step is choosing which microgreens you want to grow. There are plenty of options, from mild to spicy, so pick something that suits your taste. Some popular choices include broccoli, kale, arugula, radish, and mustard.
Preparing Your Container
Next, you'll need a shallow container. This could be a seed tray, a repurposed plastic container, or even a pie tin. If you're not growing hydroponic microgreens, make sure your container has drainage holes to prevent waterlogging.
Soil vs. Hydroponic
Growing tips differ slightly depending on whether you're using soil or going hydroponic. For soil, simply fill your container with about an inch of potting mix. For hydroponic microgreens, you'll use a growing mat or pad in your tray and skip the soil.
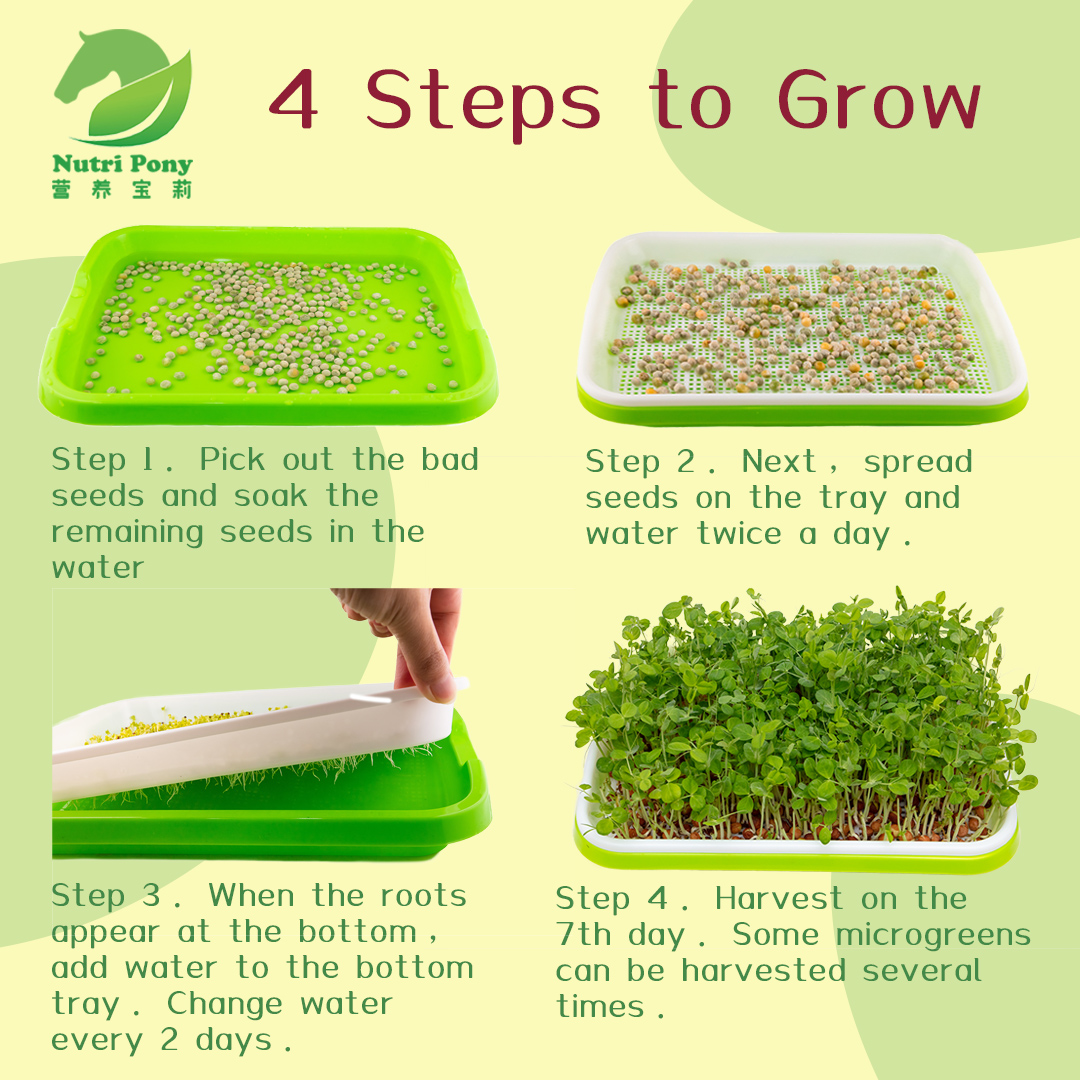
Planting Your Seeds
Now it's time to plant your seeds. Sprinkle them evenly and thickly onto the soil or growing mat. The seeds should be touching but not stacked on top of each other.
Watering
Water your seeds gently using a spray bottle. You want the soil or growing mat to be damp but not waterlogged. If you're using soil, you can water from the bottom by placing the tray in a sink or larger container filled with water, allowing the soil to absorb the water from below.
Light Requirements
Microgreens need plenty of light to grow. A sunny windowsill is ideal, but if you don't have one, you can use grow lights. Keep the lights on for about 14-16 hours a day.
Caring for Your Microgreens
Growing tips for caring for your microgreens are simple. Keep the soil or growing mat moist with your spray bottle, and make sure they're getting enough light. In just 1-3 weeks, you should see tiny plants emerging.
Harvesting Your Microgreens
Once your microgreens have grown their first set of true leaves (the leaves that look like the plant's mature leaves), they're ready to harvest. Simply snip them off at the base with scissors.
Storing Microgreens
After harvesting, store your microgreens in a sealed container in the fridge. They should keep for about a week.
Troubleshooting Common Problems
Growing microgreens is pretty straightforward, but you might encounter a few issues. If your seeds aren't germinating, they might not be getting enough water or warmth. If your microgreens are leggy, they probably need more light.
Advanced Techniques: Growing Hydroponic Microgreens
If you want to take your indoor gardening to the next level, consider growing hydroponic microgreens. This method uses a growing mat and nutrient-rich water instead of soil. It's cleaner and can be more efficient, but it requires a bit more setup.
Getting Creative with Microgreens
Once you've mastered the basics, don't be afraid to get creative. Mix different types of seeds, experiment with different containers, or even try growing microgreens vertically to save space.
Where to Learn More
If you're hungry for more information, check out this guide to growing microgreens for detailed tips and tricks.
Conclusion
Growing microgreens at home is a fun and rewarding way to add fresh, healthy greens to your diet. With just a few simple steps and some basic supplies, you can have a constant supply of these tiny, nutritious plants right in your kitchen. So, what are you waiting for? Get growing!
FAQs
Q: How long do microgreens take to grow? A: Microgreens are typically ready to harvest in 1-3 weeks, depending on the type of seed.
Q: Can I grow microgreens without soil? A: Yes! Growing hydroponic microgreens is a soil-less method that uses a growing mat and nutrient-rich water.
Q: How do I know when my microgreens are ready to harvest? A: Microgreens are ready to harvest when they've grown their first set of true leaves.
Q: How should I store my microgreens? A: After harvesting, store your microgreens in a sealed container in the fridge. They should keep for about a week.
Q: What if my microgreens aren't growing? A: If your seeds aren't germinating, they might not be getting enough water or warmth. If your microgreens are leggy, they probably need more light.

0 Response to " Grow Microgreens at Home, Easy Steps"
Post a Comment