DIY Compost Bin, Build at Home Easily
How to Build a Compost Bin at Home: Your DIY Guide
Ever wondered how to turn your kitchen scraps and yard waste into nutrient-rich fertilizer for your garden? Building a compost bin at home is not only eco-friendly but also cost-effective. Let's dive into the world of composting and learn how to create your own homemade compost bin.
Why Compost?
Before we start, let's understand the benefits of composting. It's like giving your garden a superfood smoothie!
- Reduces waste: By composting, you're keeping organic waste out of landfills, reducing methane gas emissions.
- Enhances soil health: Compost improves soil structure, increases water retention, and boosts nutrient levels.
- Saves money: Instead of buying expensive fertilizers, you're creating your own nutrient-rich soil amendment.
Understanding the Composting Process
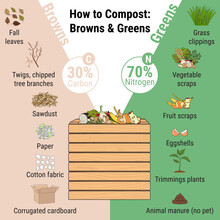
Composting is like a big, natural recycling process. It involves four key ingredients:
- Greens (nitrogen-rich materials like fruit and vegetable scraps, coffee grounds, and grass clippings)
- Browns (carbon-rich materials like dry leaves, straw, and cardboard)
- Water
- Air
When these ingredients are mixed in the right ratio (about 3 parts browns to 1 part greens), microorganisms break them down, creating compost.
Choosing Your Compost Bin Materials
Now that you know the basics, let's talk about the materials you'll need to build your homemade compost bin.
- Wood: Untreated wood pallets or lumber are excellent choices. They're durable, allow airflow, and are easy to work with.
- Wire mesh or hardware cloth: This provides ventilation and allows excess water to drain.
- Hinges and screws: To assemble your bin and make it easy to access your compost.
- Optional: Thermometer: To monitor the heat generated by the composting process.
Designing Your Compost Bin
There are numerous compost bin designs, but we'll focus on a simple, three-bin system. This allows you to rotate your compost as it progresses through different stages.
- Primary bin: Where you'll add your greens and browns.
- Secondary bin: Where partially decomposed materials will be moved to finish composting.
- Mature compost bin: Where you'll store your finished compost until you're ready to use it.
Each bin should be about 3' x 3' x 3' to provide enough space for materials to decompose properly.
Building Your Compost Bin: Step-by-Step
Step 1: Gather Your Materials
Collect all the materials you'll need, including tools like a saw, hammer, and drill.
Step 2: Cut the Wood
Cut your wood into the following sizes:
- Sides and back: 3' x 3'
- Front: 3' x 3' with a 2' x 3' door cut out
- Bottom: 2' x 3' with 1" holes drilled for drainage
Step 3: Assemble the Bin
Using screws or nails, attach the sides, back, and bottom to create a bin with an open front. Attach hinges to one side of the door and secure it to the bin.
Step 4: Add Ventilation
Attach wire mesh or hardware cloth to the sides and bottom of the bin to allow airflow and drainage.
Step 5: Repeat
Build two more bins, following the same steps. You can make them identical or vary the size slightly for different stages of composting.
Setting Up Your Compost Bin
Now that your bins are built, it's time to set them up in your yard.
- Choose a location: Place your bins in a dry, shady spot with good drainage. Avoid areas with standing water or near water sources.
- Add a layer of browns: Start each bin with a layer of carbon-rich materials to absorb moisture and prevent odors.
- Begin composting: Add your greens and browns in the correct ratio, mixing them as you go. Water lightly and turn the pile occasionally to aerate.
Compost Bin Maintenance
Maintaining your homemade compost bin is crucial for successful composting. Here are some tips:
- Monitor moisture: Your compost should feel like a wrung-out sponge. Add water if it's too dry, or mix in more browns if it's too wet.
- Turn the pile: Use a pitchfork or compost aerator to turn the pile every 1-2 weeks to aerate and mix the materials.
- Keep it covered: This helps retain heat and moisture, speeding up the composting process.
- Avoid adding: Meat, dairy, diseased plants, and weed seeds to prevent pests and weeds.
For more detailed information on composting, check out the EPA's guide on composting at home.
Harvesting Your Compost
Once your compost is dark, crumbly, and smells like earth, it's ready to use. Sift out any remaining large pieces and use your homemade compost to enrich your garden soil.
Conclusion
Building a compost bin at home is a rewarding way to reduce waste and create nutrient-rich fertilizer for your garden. With a little effort and the right materials, you can create a homemade compost bin that transforms your kitchen scraps and yard waste into a valuable resource.
FAQs
-
How long does it take to make compost?
- The time it takes to make compost varies depending on factors like bin size, materials, and climate. On average, it takes 3-6 months, but it can take up to a year.
-
Can I compost in an apartment?
- Yes, you can! Consider using a small, enclosed compost bin or a vermicomposting system with red wiggler worms.
-
What should I do with my compost once it's ready?
- Use your compost as a soil amendment, mixing it into garden beds or using it as a top dressing. You can also use it to make compost tea, a liquid fertilizer.
-
Can I compost in the winter?
- Yes, but the process will be slower due to cooler temperatures. Insulating your bin and adding hot materials like coffee grounds can help maintain heat.
-
How do I know when my compost is ready?
- Your compost is ready when it's dark, crumbly, and smells like earth. It should be free of recognizable materials and have a consistent texture.

0 Response to " DIY Compost Bin, Build at Home Easily"
Post a Comment