Master Aloe Vera Propagation: Grow from Cuttings Today

Imagine transforming a single aloe vera leaf into a thriving, lush plant that not only adds a touch of greenery to your home but also offers numerous health benefits. Sounds magical, right? Well, it's entirely possible with the right knowledge and a bit of patience. In this guide, we'll walk you through the process of how to grow aloe vera from cuttings, ensuring you have all the tools and tips you need to become a master of aloe vera gardening.
Understanding Aloe Vera Propagation
Before we dive into the specifics of how to grow aloe vera from cuttings, let's understand what propagation means. Propagation is the process of creating new plants from existing ones. For aloe vera, this can be done through seeds, offsets (pups), or cuttings. Today, we'll focus on the latter—a method that's both straightforward and rewarding.
Why Choose Cuttings?
Cutting aloe vera is a popular method for several reasons:
- Ease of Access: You can use leaves from an existing plant.
- Quick Results: Cuttings often root faster than seeds.
- Consistency: The new plant will have the same characteristics as the parent plant.
Preparing for Aloe Vera Planting
Tools You'll Need
To get started, you'll need a few basic tools:
- A sharp, clean knife or scissors
- A pot with good drainage
- Well-draining soil mix (cactus or succulent mix works best)
- Rooting hormone (optional but helpful)
- A clear plastic bag or dome
Choosing the Right Cutting
Selecting the right cutting is crucial. Look for a healthy, mature leaf from the outer part of the plant. Avoid leaves that are too young or too old, as they may not root well.
Step-by-Step Guide to Grow Aloe Vera from Cuttings
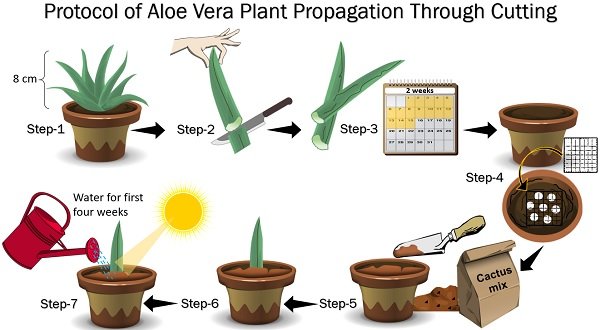
Step 1: Cutting the Leaf
Using your sharp knife or scissors, carefully cut a leaf from the base of the plant. Make sure the cut is clean and straight. This will help the leaf heal quickly and reduce the risk of infection.
Step 2: Preparing the Cutting
Allow the cut end of the leaf to dry out for a few days. This process, known as callusing, helps prevent rot. Place the leaf in a cool, dry area away from direct sunlight.
Step 3: Planting the Cutting
Once the cut end has callused, it's time to plant. Fill your pot with the well-draining soil mix. Dip the cut end of the leaf in rooting hormone (if using) and plant it about 1-2 inches deep in the soil. Firm the soil around the leaf to keep it upright.
Step 4: Creating a Humid Environment
Aloe vera cuttings need a humid environment to root. Cover the pot with a clear plastic bag or dome to create a mini greenhouse. Make sure the bag doesn't touch the leaf. Place the pot in a location with bright, indirect light.
Step 5: Watering and Care
Water the soil lightly, ensuring it stays moist but not waterlogged. Check the soil every few days and water as needed. In about 2-4 weeks, you should see new growth, indicating that the cutting has rooted.
Tips for Successful Aloe Vera Gardening
Patience is Key
Growing aloe vera indoors from cuttings requires patience. Don't be discouraged if you don't see immediate results. Remember, good things take time.
Light and Temperature
Aloe vera thrives in bright, indirect light. Avoid direct sunlight, as it can scorch the leaves. Maintain a consistent temperature between 65-75°F (18-24°C).
Watering Techniques
Overwatering is a common mistake. Aloe vera is a succulent and stores water in its leaves. Allow the soil to dry out between waterings. A good rule of thumb is to water when the top inch of soil is dry.
Troubleshooting Common Issues
Rotting Cuttings
If your cutting starts to rot, it's likely due to overwatering or not allowing the cut end to callus properly. Remove the rotting part and try again.
Slow Rooting
If your cutting is taking longer than expected to root, it might need more humidity or warmer temperatures. Consider using a heat mat or increasing the humidity around the plant.
Pests and Diseases
Aloe vera is relatively pest-resistant, but it can still fall prey to common houseplant pests like mealybugs or scale insects. Regularly inspect your plant and treat any issues promptly.
Additional Resources
For more in-depth information, check out these authoritative sources:

Conclusion
Propagating aloe vera from cuttings is a rewarding experience that combines the joy of gardening with the satisfaction of nurturing new life. By following these steps and tips, you'll be well on your way to growing a healthy, vibrant aloe vera plant. So, why wait? Grab your tools and get started today!
Call to Action
Ready to dive deeper into the world of aloe vera gardening? Click here to explore more tips and tricks on how to grow aloe vera from cuttings and transform your home into a lush, green oasis.
FAQs
How long does it take for aloe vera cuttings to root?
- It typically takes 2-4 weeks for aloe vera cuttings to root, but this can vary depending on environmental conditions.
Can I grow aloe vera indoors year-round?
- Yes, aloe vera can thrive indoors year-round with the right care. Ensure it gets plenty of bright, indirect light and consistent temperatures.
What is the best soil for aloe vera?
- A well-draining cactus or succulent mix is ideal for aloe vera. Avoid heavy, water-retentive soils.
How often should I water my aloe vera plant?
- Water your aloe vera plant when the top inch of soil is dry. This usually means watering every 2-3 weeks, but it can vary based on humidity and temperature.
Can I use aloe vera gel from my plant?
- Yes, you can harvest aloe vera gel from your plant for various uses. Simply cut a leaf, slice it open, and scoop out the gel.

Happy gardening!
0 Response to "Master Aloe Vera Propagation: Grow from Cuttings Today"
Post a Comment