How to Build a DIY Rainwater Harvesting System

In an era where water conservation is more critical than ever, building a DIY rainwater harvesting system is not just a smart move—it's a responsible one. Imagine harnessing the power of nature to water your garden, wash your car, or even flush your toilets. Sounds like a dream? It's not. With a little effort and some basic materials, you can create an eco-friendly, sustainable living solution that will save you money and help the environment. Let's dive into the details of how to build a DIY rainwater harvesting system.
Understanding the Basics of Rainwater Collection
Before we get our hands dirty, let's understand the basics. Rainwater harvesting is the process of collecting and storing rainwater for later use. This simple yet effective method can significantly reduce your water bills and contribute to water conservation efforts.
Why Should You Build a DIY Rainwater Harvesting System?
- Water Conservation: By collecting rainwater, you reduce the demand on municipal water supplies.
- Cost Savings: Using harvested rainwater for non-potable purposes can lower your water bills.
- Eco-Friendly: Rainwater is naturally soft and free from chemicals, making it ideal for gardening and other uses.
Materials and Tools You'll Need
To build your DIY rainwater harvesting system, you'll need the following materials and tools:
- Rain barrel or storage tank
- Gutter system
- Downspout diverter
- Hose or spigot
- Screwdriver
- Drill
- Level
- Sealant
- Filter (optional)
Step-by-Step Guide to Building Your DIY Rainwater Harvesting System
Step 1: Choose the Right Location
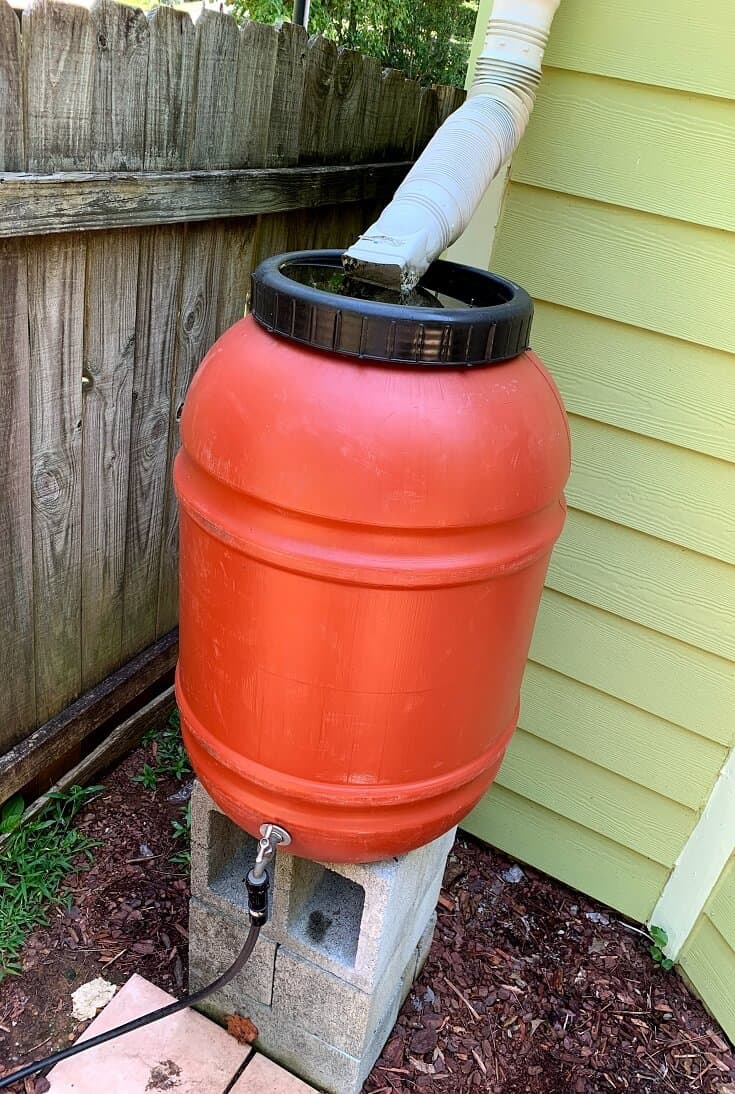
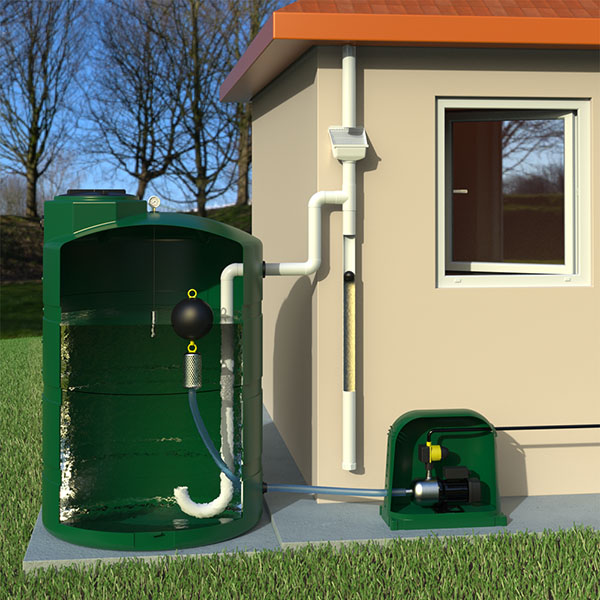
The first step is to choose the right location for your rainwater harvesting system. Ideally, you want to place your rain barrel or storage tank near a downspout from your gutter system. This ensures that the rainwater can easily flow into the barrel.
Step 2: Install the Gutter System
If you don't already have a gutter system, you'll need to install one. Gutters collect rainwater from your roof and direct it to the downspout. Make sure your gutters are clean and free from debris to maximize water collection.
Step 3: Install the Downspout Diverter
A downspout diverter is a device that redirects rainwater from the downspout into your rain barrel. Install the diverter according to the manufacturer's instructions. This usually involves cutting the downspout and attaching the diverter.
Step 4: Set Up the Rain Barrel
Place your rain barrel on a level surface. Use a level to ensure it's properly positioned. If the barrel is not level, water may not flow correctly into it.
Step 5: Connect the Hose or Spigot
Attach a hose or spigot to the bottom of the rain barrel. This will allow you to easily access the collected rainwater. Make sure the connection is secure and use sealant if necessary to prevent leaks.
Step 6: Optional - Install a Filter
If you plan to use the collected rainwater for purposes that require cleaner water, consider installing a filter. Filters can help remove debris and contaminants from the rainwater.
Step 7: Test Your System
Once everything is set up, test your system by simulating rainfall. Pour water into the gutters and observe how it flows into the rain barrel. Make any necessary adjustments to ensure the system is functioning properly.
Maintaining Your Rainwater Harvesting System
Regular maintenance is key to keeping your rainwater harvesting system in top condition. Here are some tips:
- Clean the Gutters: Regularly clean your gutters to remove debris and ensure proper water flow.
- Check for Leaks: Inspect your system for leaks and make repairs as needed.
- Empty the Barrel: Empty the rain barrel periodically to prevent the buildup of sediment and contaminants.
Benefits of a DIY Rainwater Harvesting System
Building a DIY rainwater harvesting system offers numerous benefits:
- Sustainable Living: By collecting and using rainwater, you're contributing to a more sustainable lifestyle.
- Reduced Water Bills: Using harvested rainwater for non-potable purposes can significantly lower your water bills.
- Environmentally Friendly: Rainwater is free from chemicals and naturally soft, making it ideal for gardening and other uses.
Conclusion
Building a DIY rainwater harvesting system is not just a fun project; it's a step towards a more sustainable future. By collecting and using rainwater, you're conserving a precious resource, saving money, and contributing to a healthier environment. So, why wait? Grab your tools, gather your materials, and start building your own rainwater harvesting system today.
FAQs
How much rainwater can I collect? The amount of rainwater you can collect depends on the size of your roof and the amount of rainfall in your area. A general rule is that you can collect about 0.62 gallons of water per square foot of roof surface for every inch of rain.
Can I use harvested rainwater for drinking? While rainwater can be used for various purposes, it is generally not recommended for drinking unless it has been properly filtered and treated.
What is the best type of rain barrel to use? The best type of rain barrel depends on your specific needs and preferences. Look for barrels made from durable materials like plastic or metal, and consider the capacity and design that suits your space.
How often should I clean my rainwater harvesting system? It's a good idea to clean your gutters and check your system for leaks at least twice a year. Emptying the rain barrel periodically can also help prevent the buildup of sediment and contaminants.
Can I connect multiple rain barrels for more storage? Yes, you can connect multiple rain barrels to increase your storage capacity. This can be done using hoses or pipes to link the barrels together, allowing water to flow from one to the next as they fill up.

:max_bytes(150000):strip_icc()/conservation-efforts-why-should-we-save-water-3157877-Final-edit-112bc340e95f4a94933c6eb245f63785.jpg)
By following these steps and tips, you'll be well on your way to creating a functional and eco-friendly rainwater harvesting system. Happy building!
0 Response to "How to Build a DIY Rainwater Harvesting System"
Post a Comment