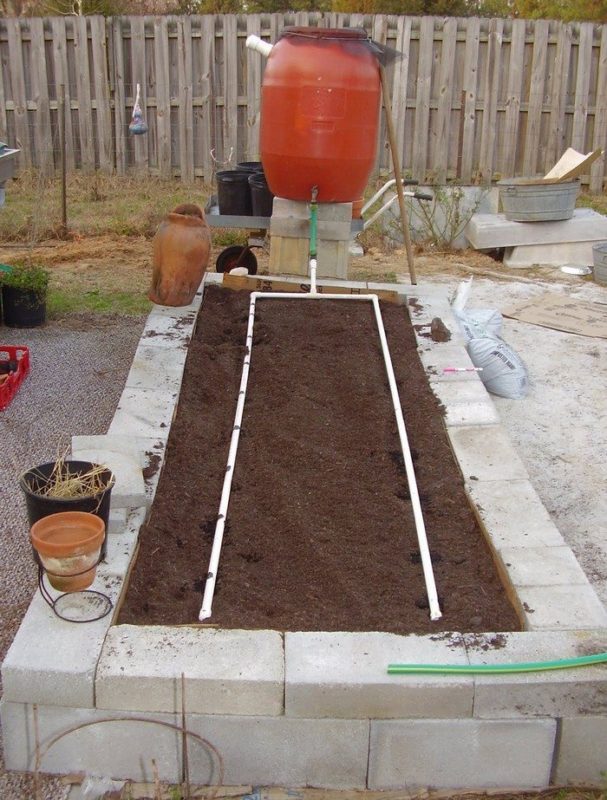
How to Build a DIY Irrigation System for Home Gardens

Are you tired of lugging around a watering can or hose to keep your garden lush and vibrant? Imagine having a system that does the hard work for you, ensuring your plants get the water they need without you lifting a finger. Building a DIY irrigation system for your home garden is not only a practical solution but also a rewarding project. Let's dive into the steps to create an efficient and effective irrigation system that will transform your garden maintenance routine.
Understanding the Basics of Home Irrigation
Before we get our hands dirty, it's essential to understand the basics of home irrigation. An irrigation system is designed to deliver water to your plants in a controlled and efficient manner. This not only saves you time but also conserves water, which is crucial for sustainable gardening.
Types of Irrigation Systems
There are several types of irrigation systems you can choose from, each with its own advantages:
- Drip Irrigation: This system delivers water directly to the roots of your plants, minimizing water waste. It's ideal for gardens with a variety of plants.
- Sprinkler Systems: These systems mimic natural rainfall and are great for large lawns or gardens with uniform plant types.
- Soaker Hoses: These hoses are porous and allow water to seep out along their length, providing a slow and steady water supply.
Planning Your DIY Irrigation System
Planning is the key to a successful DIY irrigation system. Start by assessing your garden's needs and layout. Consider factors like the types of plants, soil conditions, and the size of your garden.
Step 1: Map Out Your Garden
Draw a map of your garden, noting the locations of your plants, trees, and other features. This will help you determine the best placement for your irrigation components.
Step 2: Choose the Right System
Based on your garden's needs, choose the type of irrigation system that will work best. For most home gardens, a drip irrigation system is a versatile and efficient choice.
Gathering the Necessary Tools and Materials
Once you have a plan, it's time to gather the tools and materials you'll need. Here's a basic list to get you started:
- Drip irrigation tubing
- Emitters
- Connectors and fittings
- Timer
- Garden hose
- Shovel
- Scissors or pruning shears
Step 3: Install the Main Water Line
Start by laying out the main water line. This is the backbone of your irrigation system and will distribute water to the various zones in your garden.
Step 4: Connect the Emitters
Emitters are small devices that control the flow of water to your plants. Attach them to the main water line at the appropriate intervals based on your garden map.
Step 5: Test the System
Before burying any lines, test your system to ensure there are no leaks and that water is being distributed evenly. Make any necessary adjustments.
Maintaining Your DIY Irrigation System
Regular maintenance is crucial to keep your irrigation system running smoothly. Here are some tips to help you maintain your system:
- Inspect Regularly: Check your system for leaks, clogs, and damage regularly.
- Clean Emitters: Emitters can become clogged with dirt and debris. Clean them periodically to ensure proper water flow.
- Adjust Watering Schedule: Adjust your watering schedule based on the season and weather conditions to avoid overwatering or underwatering.
Additional Resources
For more detailed information and expert advice, you can refer to the following resources:
- Gardeners.com offers a comprehensive guide on drip irrigation systems.
- Home Depot provides a variety of irrigation supplies and tutorials.
- EPA WaterSense offers tips on water-efficient gardening practices.
Conclusion
Building a DIY irrigation system for your home garden is a rewarding project that can save you time and water. By understanding the basics, planning carefully, and maintaining your system, you can ensure your garden thrives with minimal effort. So, why wait? Get started on your DIY irrigation system today and watch your garden flourish!
FAQs
What is the best type of irrigation system for a small garden?
- For a small garden, a drip irrigation system is often the best choice. It delivers water directly to the roots of your plants, minimizing waste and ensuring efficient watering.
How often should I check my irrigation system for leaks?
- It's a good practice to check your irrigation system for leaks at least once a month. Regular inspections can help you catch and fix issues early, preventing water waste and potential damage to your garden.
Can I install an irrigation system myself, or do I need a professional?
- Yes, you can install a basic irrigation system yourself with the right tools and a bit of planning. However, if you're dealing with a complex system or have specific needs, consulting a professional might be beneficial.
How do I determine the watering schedule for my garden?
- The watering schedule depends on factors like plant types, soil conditions, and weather. A good starting point is to water deeply once or twice a week, adjusting as needed based on the moisture levels in your soil.
What are the benefits of using a timer with my irrigation system?
- Using a timer with your irrigation system ensures consistent watering, even when you're not home. It also helps conserve water by preventing overwatering and can be programmed to water at optimal times, such as early morning or late evening.


0 Response to "How to Build a DIY Irrigation System for Home Gardens"
Post a Comment